Tenant
A tenant represents a business organization (e.g. a company, a subsidiary or other business unit). Multi-tenancy ensures that the elements of each tenant are separate and independent. A base tenant can share its metadata with other tenants.
The contact information of the organization is displayed on the tenant page. Models, users and workflows are managed in the subpanel of the tenant. By means of annotations, the application can be configured and customized.
Only users with the access level Administrator or Editor are authorized to open the tenant page.
Only administrators can edit the tenant, configure annotations and profiles, as well as manage models, users, and workflows.
Add tenants
Tenants are added by a system administrator in the admin console.
Tenants are created in a database.
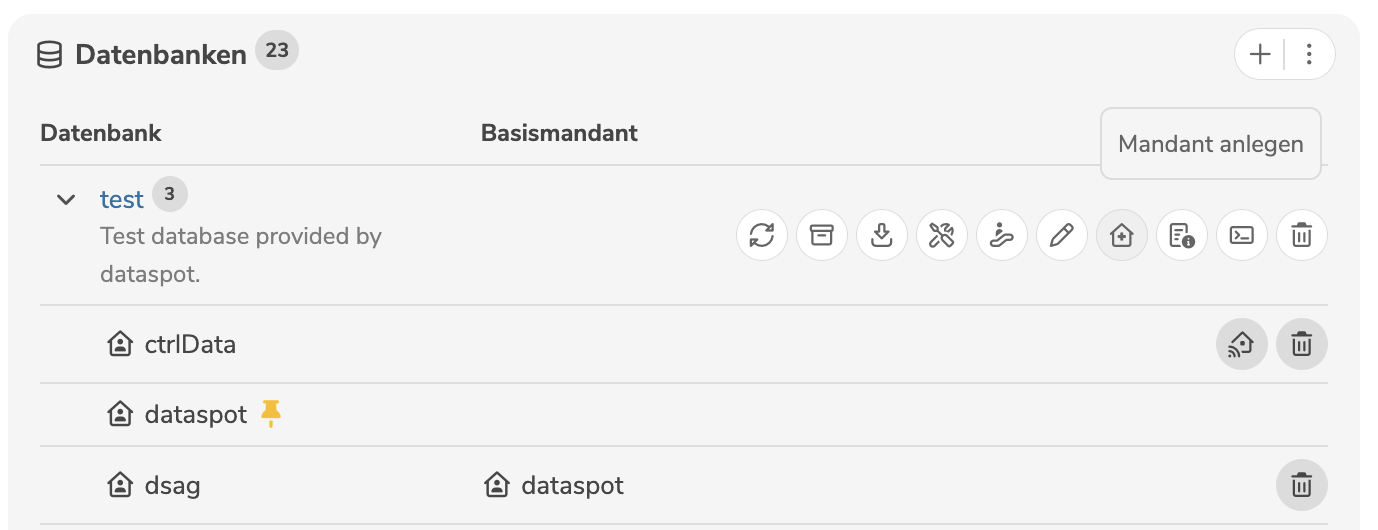
Clicking on the icon ![]() opens a dialog, where the basic data of the tenant can be specified.
opens a dialog, where the basic data of the tenant can be specified.
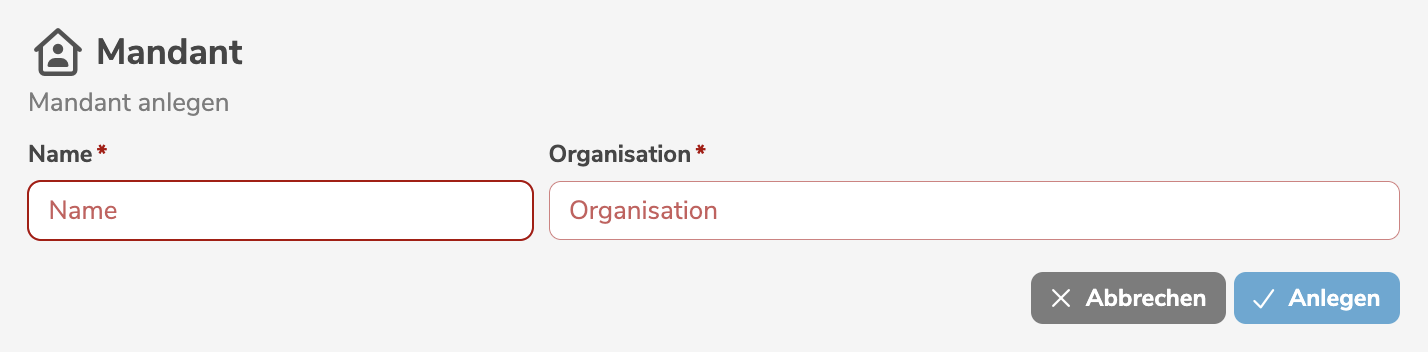
It is mandatory to assign a name and an organization.
The icon that is displayed for the tenant can be configured individually.
Clicking "Add" creates the tenant.
After creating a new tenant, the system administrator can create a metadata manager for this tenant in the database.
Multi-tenancy
Multiple, separate tenants can be added. Each tenant can be managed independently of all other tenants, with different users, workflows, models, and elements.
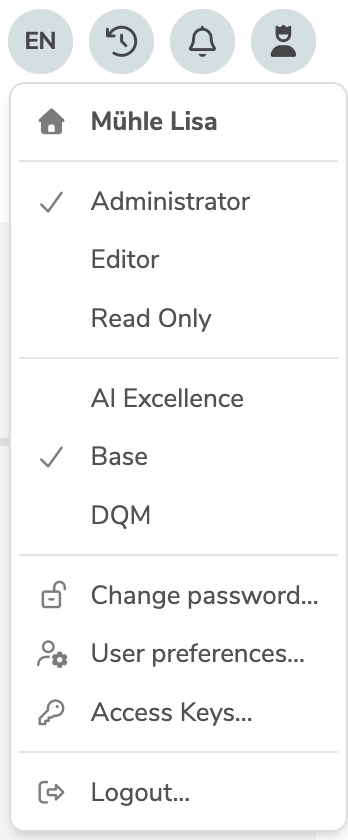
A user can be created in multiple tenants with the same login ID.
In this case, after logging in, the user can switch back and forth between these tenants in the personal user menu by clicking in the menu bar on the icon  .
.
Base tenant
Multi-tenancy basically ensures that the elements of the individual tenants are separate and independent of each other. However, depending on the corporate structure, it may be necessary to manage metadata hierarchically. In this scenario, specific metadata is to be managed centrally and shared with other organizational units. Other metadata, on the other hand, should be managed exclusively in the respective organizational units and should not be available elsewhere. The respective organizational units should not be able to modify or delete the centrally managed metadata, but should be able to augment and extend the shared metadata with their own metadata objects.
A subordinate tenant inherits the configuration from the base tenant and can extend or overwrite it.
Functionality
Optionally, a tenant can be defined as a base tenant for another tenant. This means that all elements of the base tenant are shared with the subordinate tenant. The elements of the base tenant are visible in the subordinate tenant, but cannot be edited or deleted. The elements of the subordinate tenants are not visible in the base tenant.
In general, the base tenant has no knowledge of its subordinate tenants or what elements are contained therein.
From the viewpoint of a user, who is logged in with a specific tenant, the following rules apply.
- The user is logged in with a subordinate tenant:
- They can read all elements of the base tenant.
- They can neither edit nor delete elements of the base tenant.
- They can extend the elements of the base tenant by adding their own elements.
- They can read, edit, or delete all elements of the subordinate tenant.
- They can read all elements of the base tenant.
- The user is logged in with a base tenant:
- They can read, edit, or delete all elements of the base tenant.
- They can not read any elements of any subordinate tenants.
Editing and deleting elements is still contingent on the user's access level in compliance with the role-based responsibility and authorization concept.
In the user interface, elements from the base tenant are always marked with the icon ![]() .
A user, logged in with a subordinate tenant, is made aware that these elements are inherited from the base tenant.
The user may neither edit nor delete these elements.
.
A user, logged in with a subordinate tenant, is made aware that these elements are inherited from the base tenant.
The user may neither edit nor delete these elements.
A user, logged in with a subordinate tenant, may extend elements inherited from the base tenant with their own elements, e.g. augment a business object from the base tenant with own attributes.
The extended elements are only visible in the subordinate tenant, but not in the base tenant or any other tenants.
Set base tenant
Base tenants are set by a system administrator in the admin console.
A tenant can be set as a base tenant.
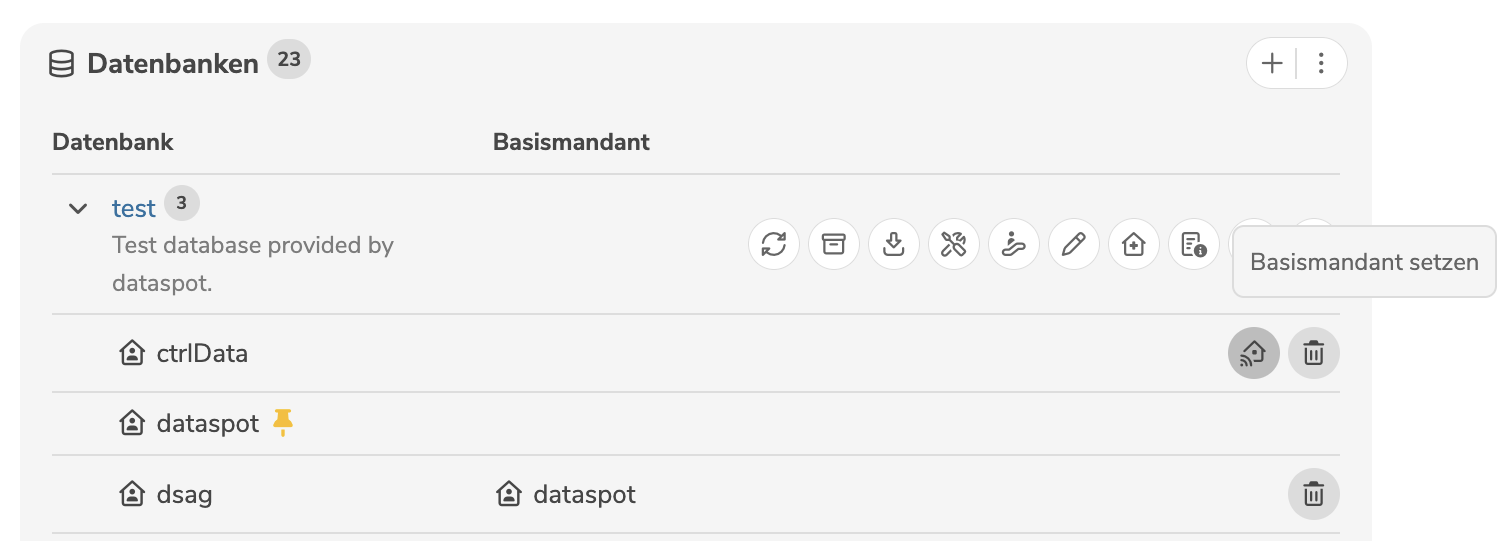
Clicking on the icon  opens a dialog, where the base tenant can be selected.
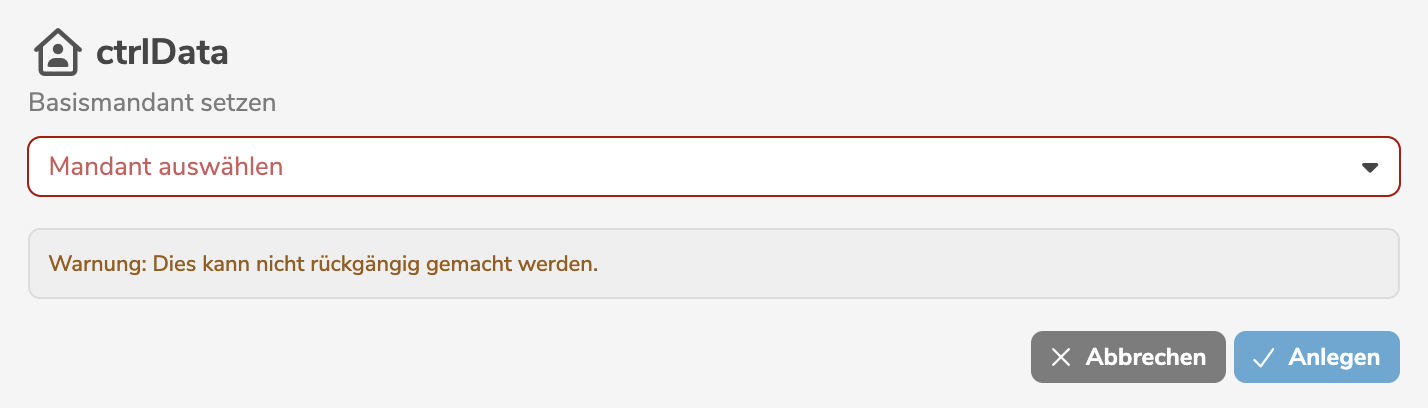
Clicking "Add" sets the base tenant.
The base tenant can only be set once for a tenant. This step is irrevocable and cannot be undone.
A base tenant can have multiple subordinate tenants. A tenant can have either no or exactly one base tenant. A tenant cannot simultaneously be both a base and a subordinate tenant, limiting the tenant hierarchy to maximum two levels.
Hints
In the context of multi-tenancy, conflicts may arise in particular when using base tenants and subordinate tenants. Special care must therefore be taken both in the management of the metadata and in the configuration of the application.
Conflicts between base and subordinate tenants
In general, the base tenant has no knowledge of its subordinate tenants or what elements are contained therein. If a new element is created in the base tenant, an element with the same name may already exist in a subordinate tenant. This potential conflict can lead to problems in presentation and processing.
On the other hand, if an element is created in a subordinate tenant that already exists in the base tenant, this conflict can be detected and displayed immediately.
In order to maintain the integrity and consistency of metadata across multiple tenants, especially between base and subordinate tenants, an analysis of rule violations can be performed.
To prevent the loss of extended metadata, if an element in the base tenant is to be deleted, that is already being extended or used in a subordinate tenant, an error occurs. The resolution of this conflict must be coordinated and resolved organizationally with the participation of both tenants involved.
Users in multiple tenants
A user, working with multi-tenancy, must be created separately in each tenant. The user must have the same login ID in each tenant.
Users with the access level Editor or Administrator must be associated with a person.
If necessary, this person must also be created in all tenants in which the user is to log in.
During authentication, the login ID is assigned to a user in the application.
Default tenant
Exactly one default tenant is defined in each database:
- The first tenant of a database is automatically the default tenant. Once a database has two or more tenants, the default tenant can be changed.
- The default tenant is taken into account when determining the login tenant.
- The annotations of the default tenant are used to customize the login dialog.
Depending on the authentication method (Single sign-on, Same sign-in, OpenID Connect), the default tenant can be overridden in the credentials.
Edit tenants
A tenant is edited in the main panel of the tenant, by clicking the edit icon (or by selecting "Edit Tenant" in the menu).
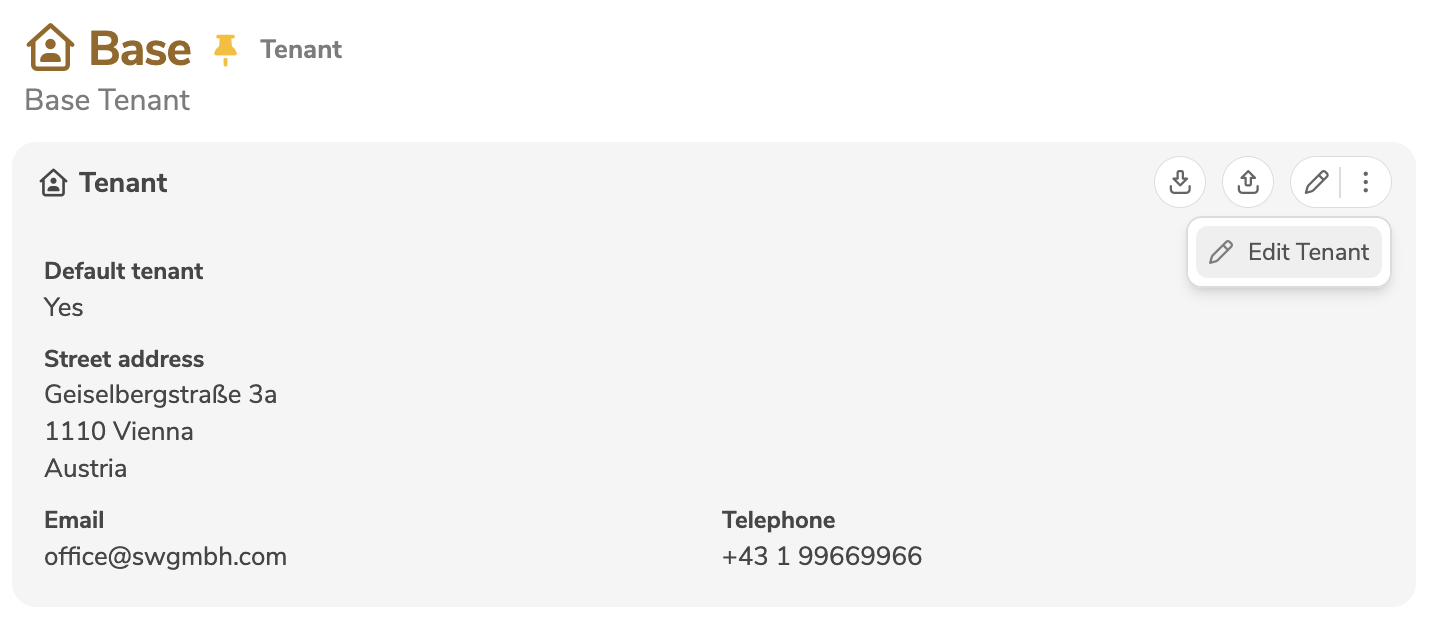
The edit mode allows the modification of the contact information.
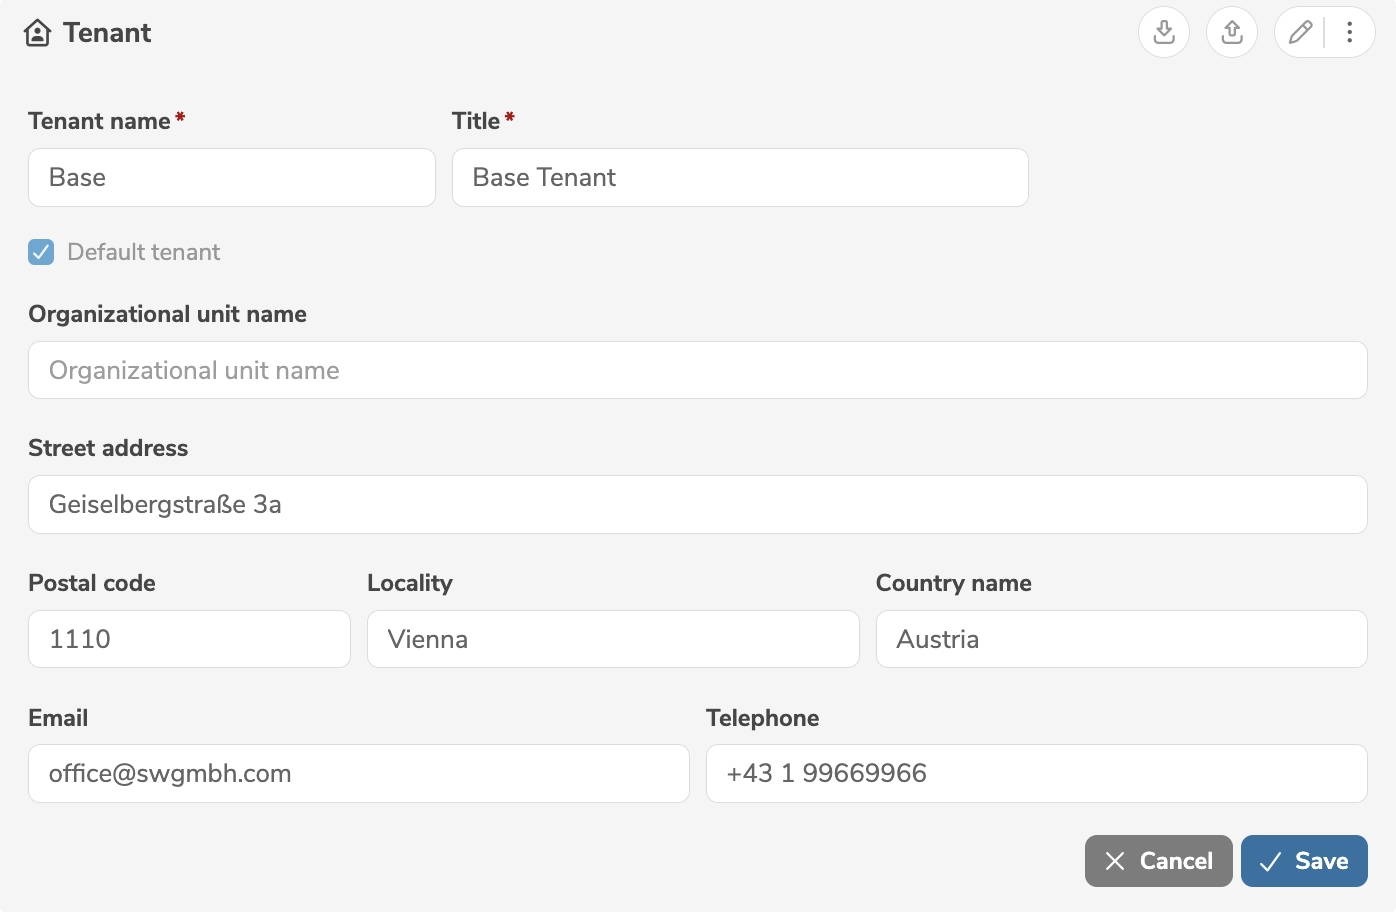
If the default tenant is selected, the previous default tenant is automatically revoked.
Clicking "Save" applies the changes.
Access rules
A user, whose login ID does not exist in the tenant, can still obtain access to the tenant, if additional access rules are configured. The access rules are evaluated to determine whether the access of an external user to the tenant is allowed or denied.
Access rules allow logging in as a guest (read-only) without a user or even to automatically create persons and users with specific access levels.
Access rules are edited in the subpanel of the tenant.
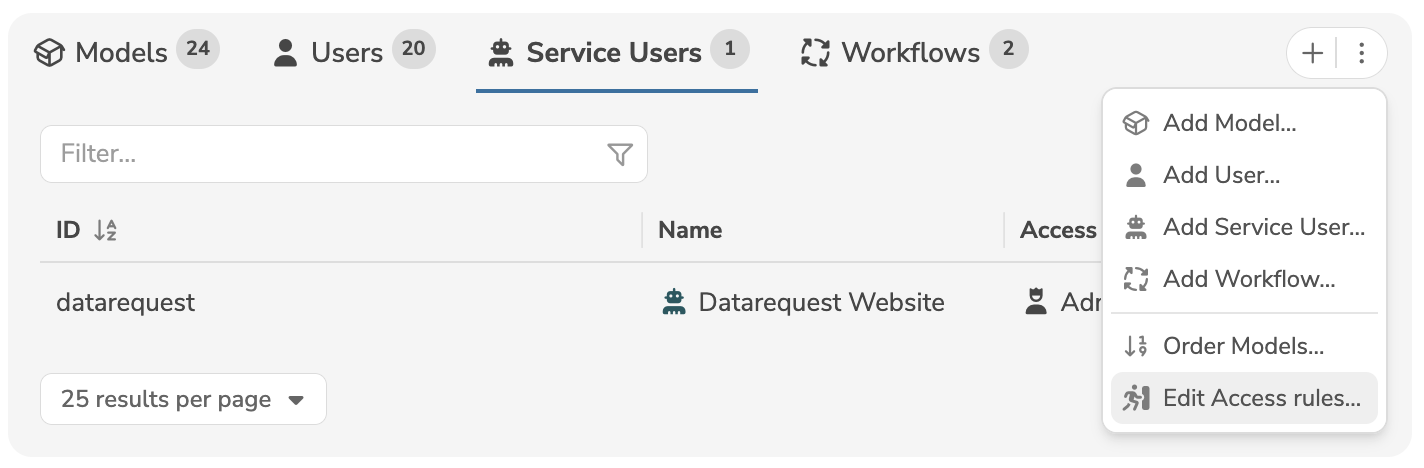
Clicking on "Edit Access rules" in the menu opens a dialog, where the access rules can be edited.
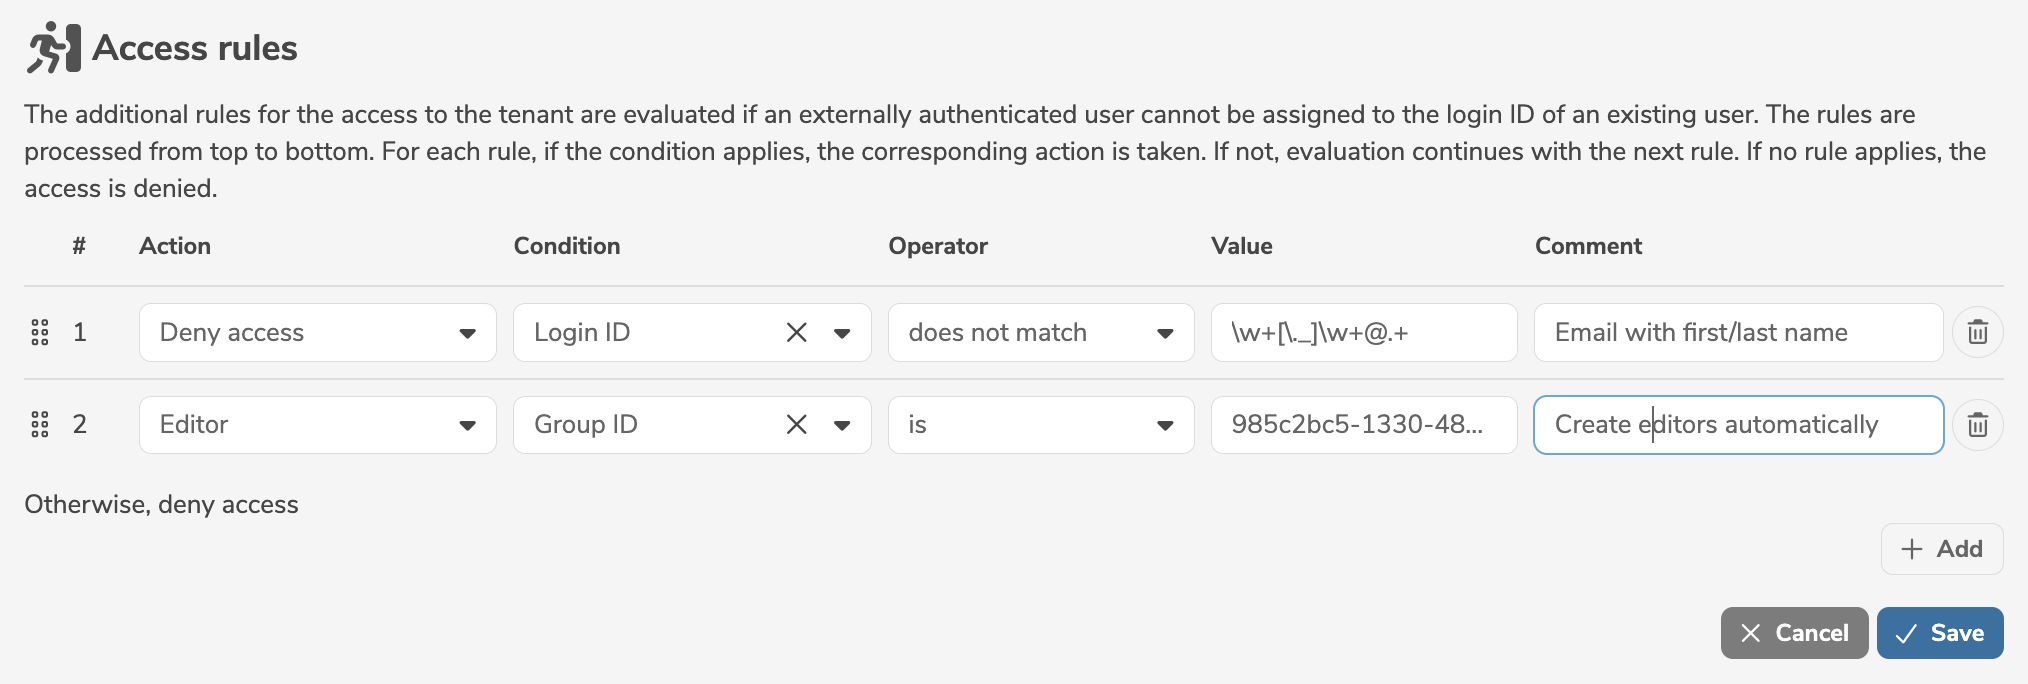
It is mandatory to define an action for each access rule:
- Deny access to the tenant
- Login as a guest (read-only) without a user
- Create user with access level Administrator (and also create an associated person)
- Create user with access level Editor (and also create an associated person)
- Create user with access level Read Only (without creating an associated person)
When a person is created automatically, the first name and family name of the person are extracted from the credentials. If the credentials don't contain a first name or family name, the user and the corresponding person cannot be created automatically.
In addition, a condition can be specified. The condition defines a property of the user (e.g. login ID, group ID, tenant ID) that is compared to a value or pattern by applying an operator. A comment describing the access rule can be provided, if required.
- A new access rule is added by clicking "Add".
- Clicking
 deletes the access rule.
 - The access rules can be rearranged with the mouse using "drag and drop".
The operators matches and does not match expect a pattern as a regular expression.
The pattern is automatically extended by ^ at the beginning and $ at the end (corresponds to start and end), i.e. these special characters must not be explicitly specified.
Clicking "Save" applies the changes.
Rule violations
Rule violation checking is performed automatically to ensure the integrity and consistency of metadata in the database. All rules, that are usually checked when an element is created, are applied again to all existing elements.
The rule violations are checked regularly and automatically in the background. The frequency or the time of the check can be configured on the server. Administrators can manually restart the check in the dashboard.
The overview of all rule violations is displayed on the tenant page:
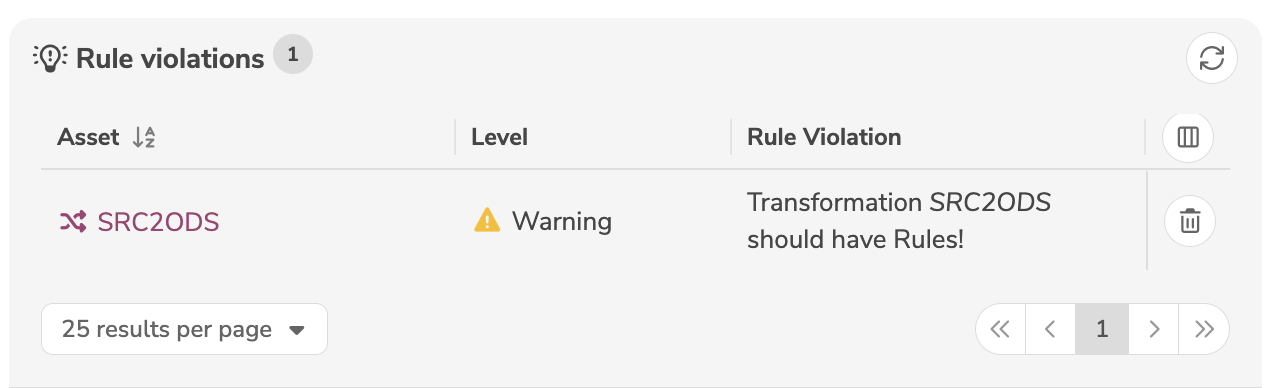
Clicking on an element opens the affected metadata object and the rule violation can be resolved manually, if possible.
Clicking on ![]() deletes the element that causes the rule violation.
Clicking on the icon
deletes the element that causes the rule violation.
Clicking on the icon ![]() rechecks all displayed rule violations.
rechecks all displayed rule violations.
In particular when using multi-tenancy, there may be inconsistencies between the elements of a base tenant and its subordinate tenants.
Annotations
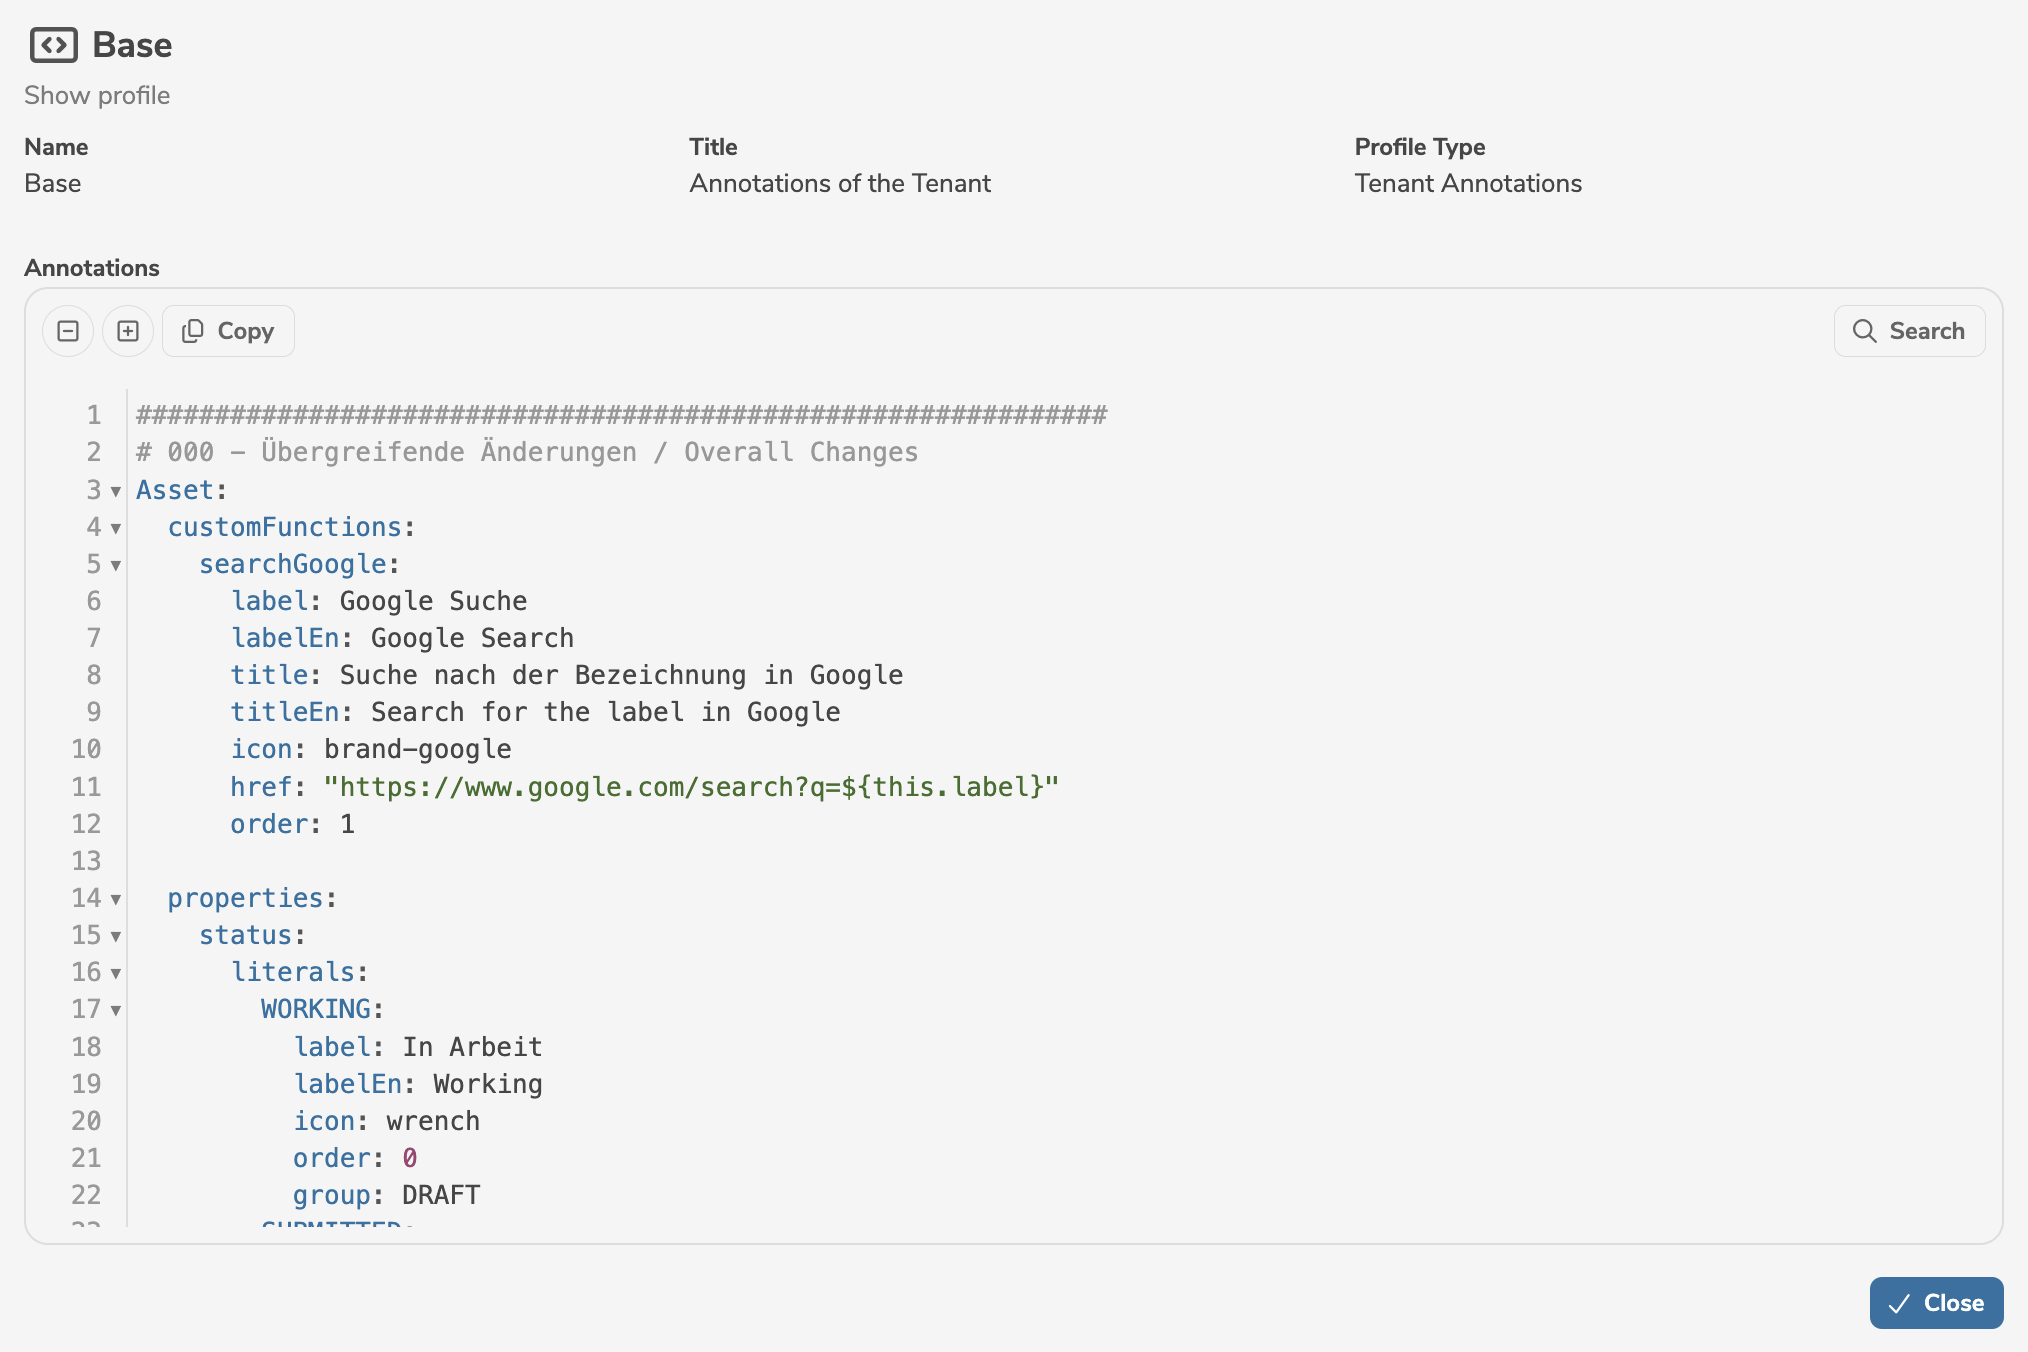
The application can be configured and customized using annotations in YAML.
A detailed description of all annotations can be found here.
The configuration is defined as follows:
| Type | Scope | Description |
|---|---|---|
| Standard Annotations | All models | Standard annotations contain the basic configuration of the application and are delivered with the software. Standard annotations cannot be edited or deleted and apply to all tenants. |
| Tenant Annotations | All models in the tenant | Tenant annotations contain the configuration of the tenant and can be defined on a customer-specific basis. Tenant annotations can be edited and only apply to the respective tenant. |
| Standard Profile | All assigned models | Standard profiles contain additional configurations for predefined application areas and are delivered with the software. Standard profiles cannot be edited or deleted. Standard profiles can be assigned to models in all tenants. |
| Tenant Profile | All assigned models in the tenant | Tenant profiles contain additional configurations for new application areas of the tenant and can be defined on a customer-specific basis. Tenant profiles can be created, edited and deleted. Tenant profiles can only be assigned to models in the respective tenant. |
By assigning standard profiles and tenant profiles to individual models, these models can be configured on a customer-specific basis.
Standard annotations and tenant annotations apply to all models in the respective scope. Standard profiles and tenant profiles can be assigned to models and only apply in these models.
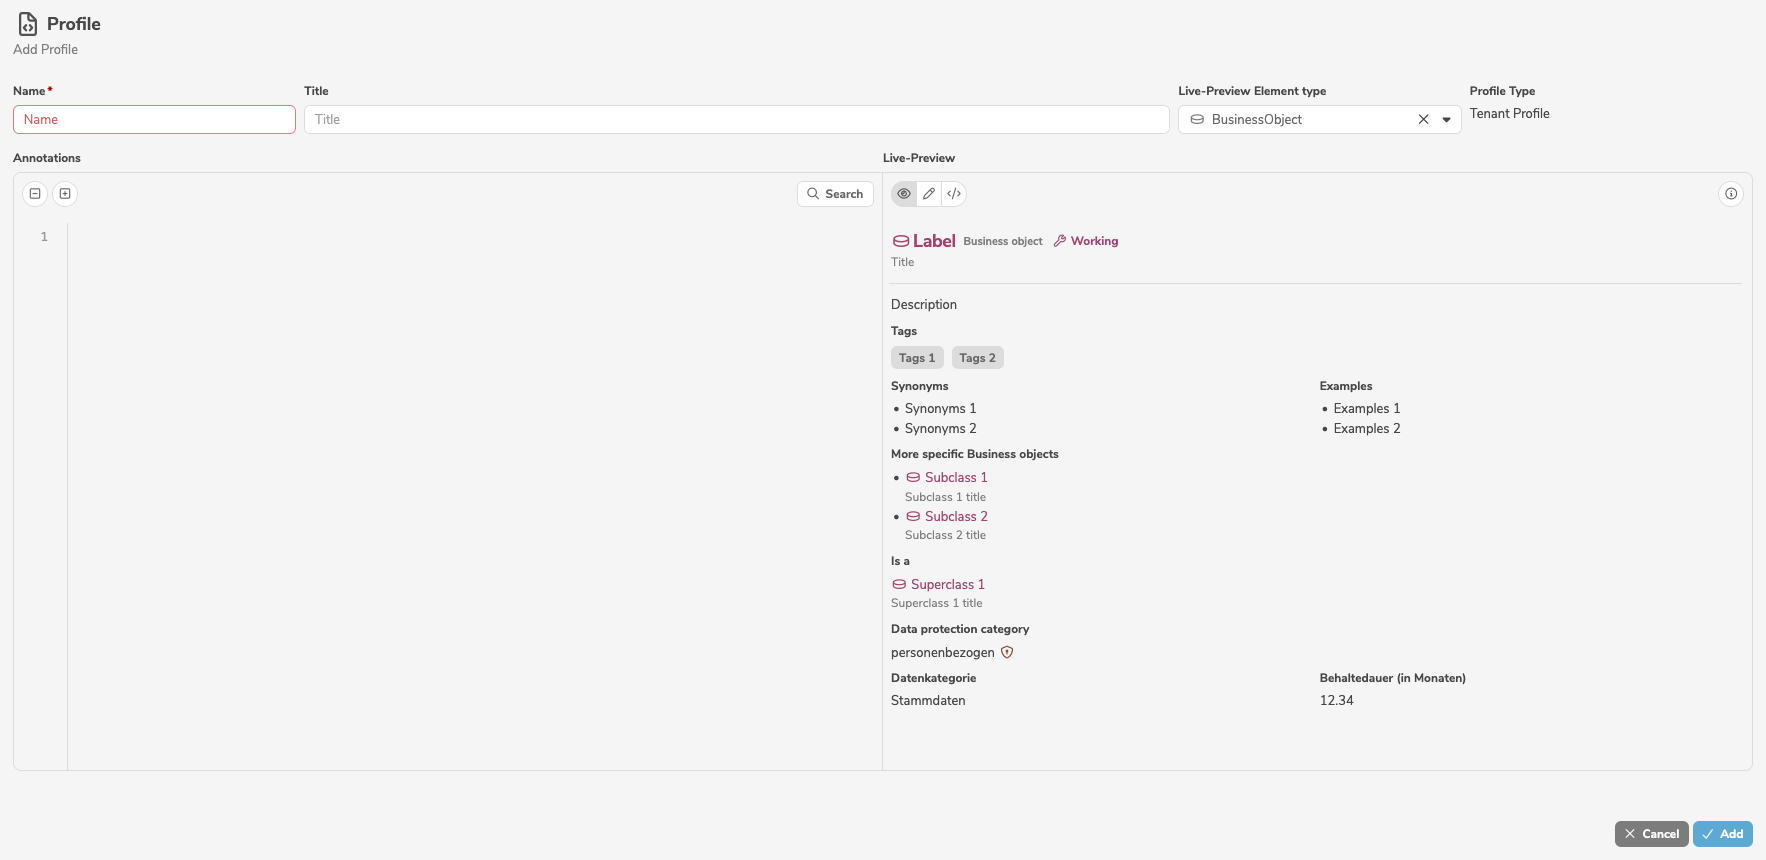
Add profiles
A new profile is added by clicking the icon "+" (or by selecting "Add Profile..." in the menu).
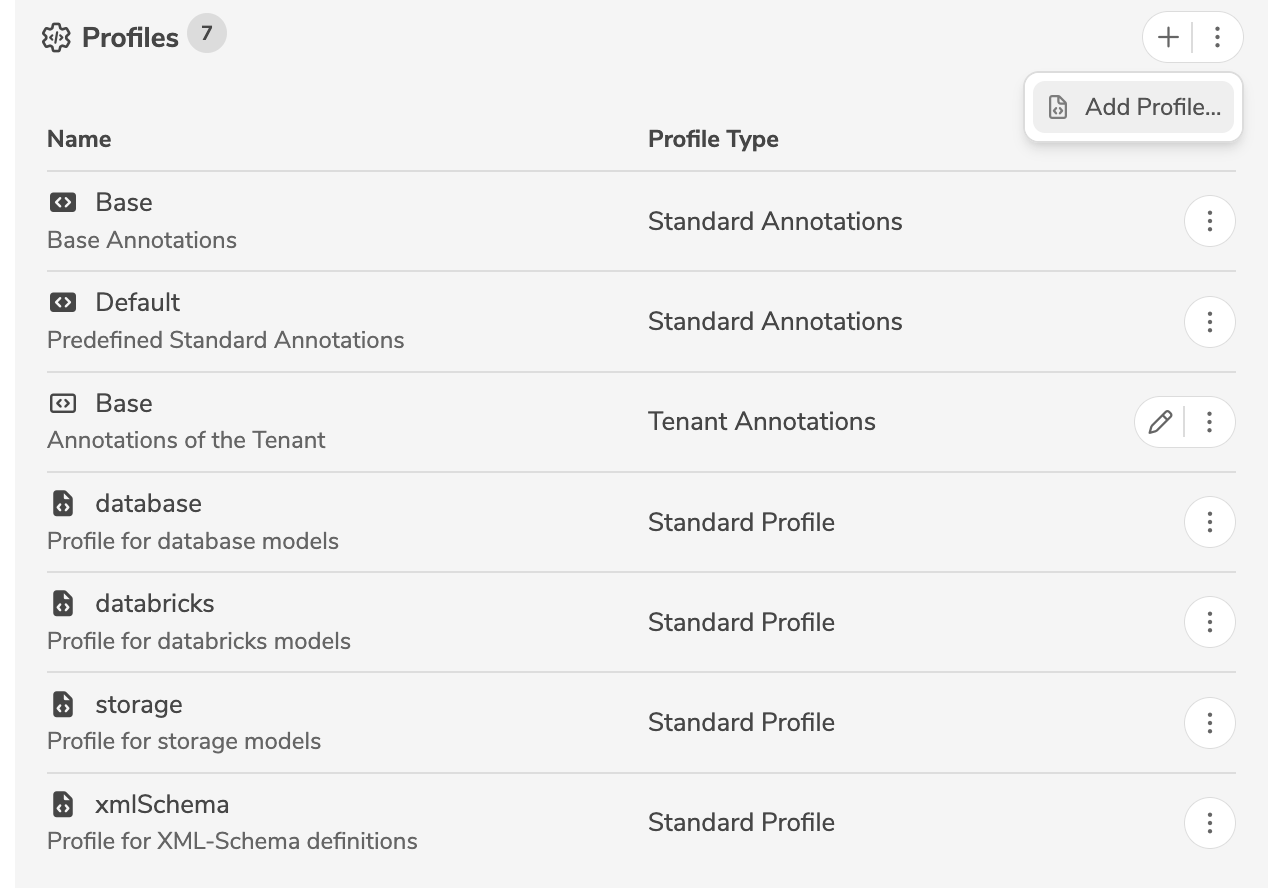
It is mandatory to assign a name to the profile. In addition, a title and the configuration in YAML can be specified.
On the right hand side, a live preview of the user interface is displayed.
Show profiles
A profile can be displayed by selecting "Show profile" in the menu next to the profile.
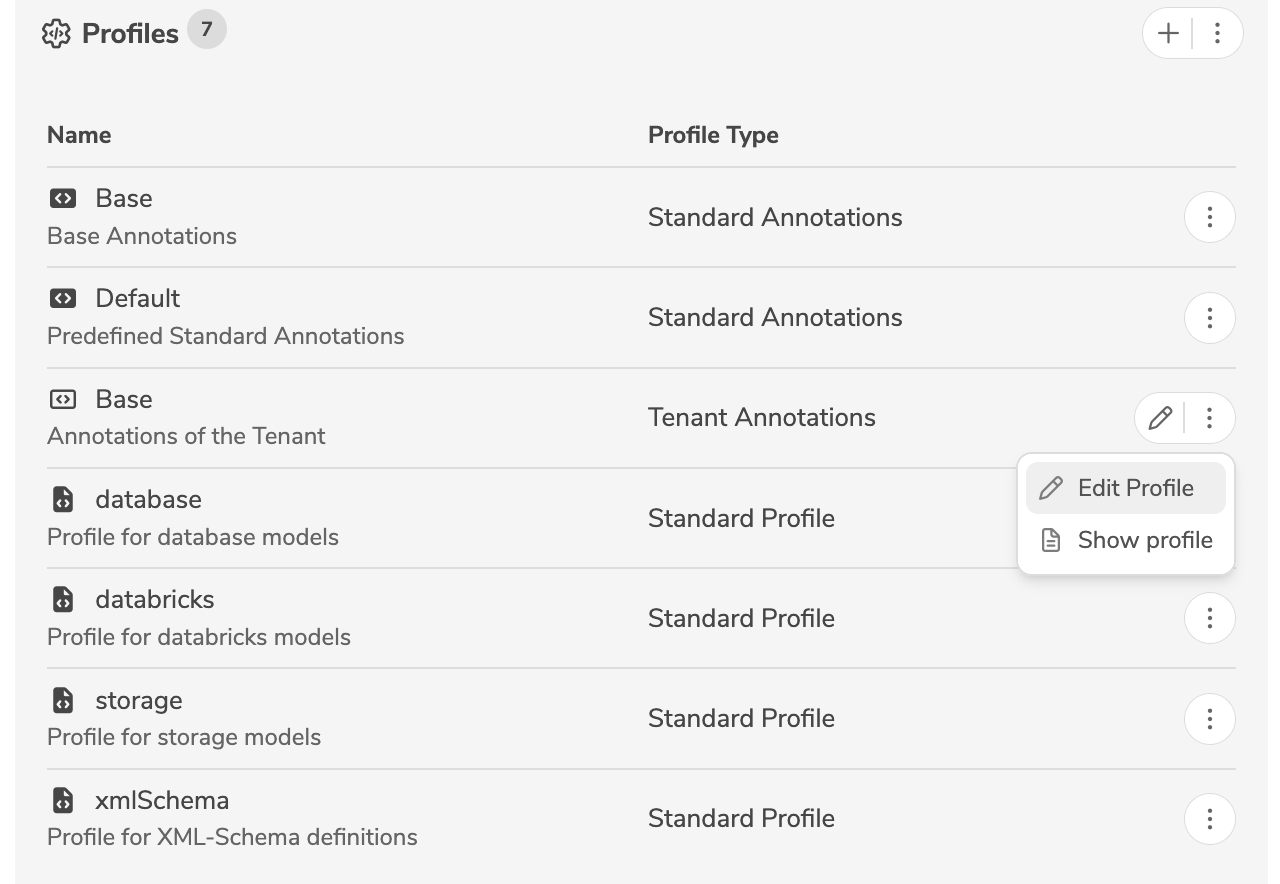
Edit profiles
A profile is edited by clicking the edit icon (or by selecting "Edit Profile" in the menu) next to the profile.
The editor supports indenting multiple lines at the same time.
If one or more lines are selected, pressing Tab indents all selected lines by two spaces.
Pressing Shift + Tab outdents all selected lines by two spaces.
To allow changes to the configuration to be tracked, all past versions of the profile are displayed in edit mode.
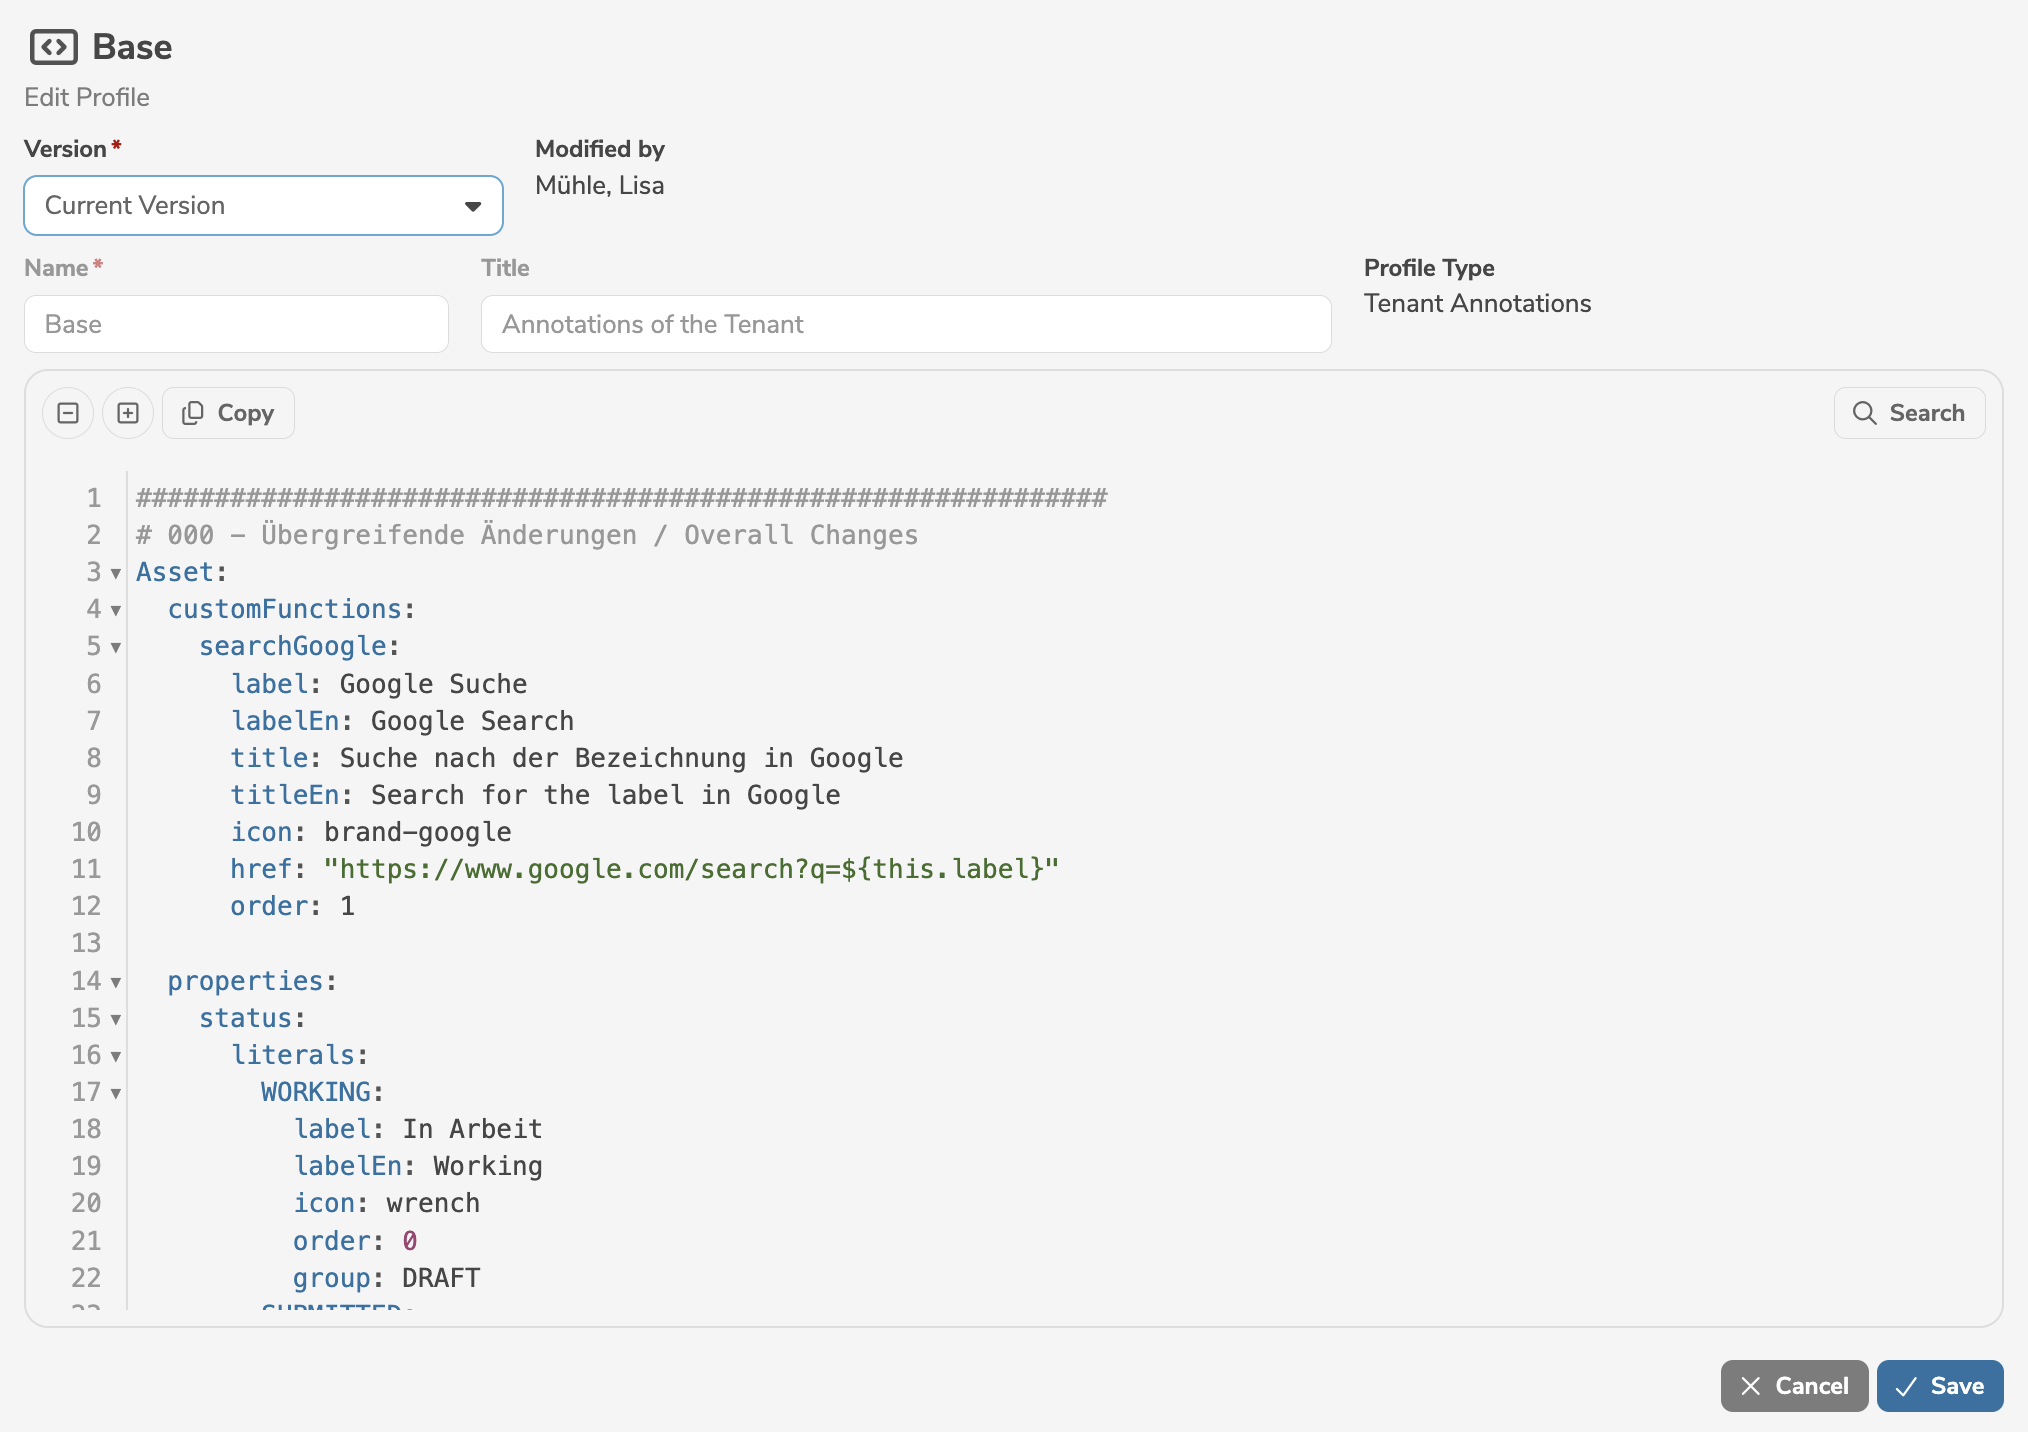
The annotations are automatically validated before being saved. An error message is displayed, if the annotations do not meet the specifications.
Clicking "Save" applies the changes.
A profile can be deleted by selecting "Delete Profile" in the menu next to the profile.
In order to maintain an overview for large configurations, the levels can be opened and closed individually by clicking on the arrows next to the line numbers.
By clicking on ![]() or
or ![]() , all levels can be collapsed or expanded.
, all levels can be collapsed or expanded.
The search function in the editor allows you to search for specific terms or objects. All search results are highlighted and can be reached by clicking the arrows next to the search field.
To prevent different administrators from overwriting each other, the annotations are locked for other users during editing.
Live preview
The editor displays a live preview of the changes. The live preview shows the user interface as it would appear after applying the current changes to the profile.
The live preview updates automatically during editing of the profile and is displayed in the currently selected language.
An element type is selected from the dropdown list for the live preview. The user interface of this element type is visualized in the live preview.
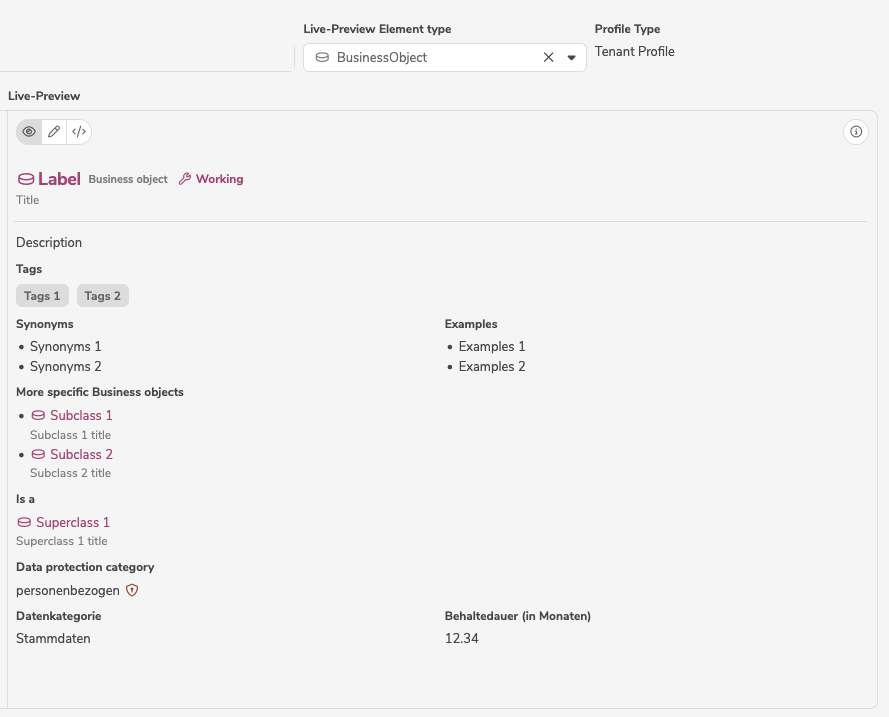
The live preview supports the following modes:
| Mode | Description |
|---|---|
| View | Shows the user interface of the selected element type in view mode. |
| Editor | Shows the user interface of the selected element type in edit mode. Clicking |
| YAML | Shows the effectively applied YAML code of the selected element type. |
Clicking ![]() displays the current positions and line breaks, making the assignment of new positions and rearranging fields easier.
displays the current positions and line breaks, making the assignment of new positions and rearranging fields easier.
Tags
A tag is a keyword or term assigned to an asset. All tags are displayed on the tenant page, grouped by their first letter.
If present, tags from the base tenant are also displayed, but cannot be edited or deleted.
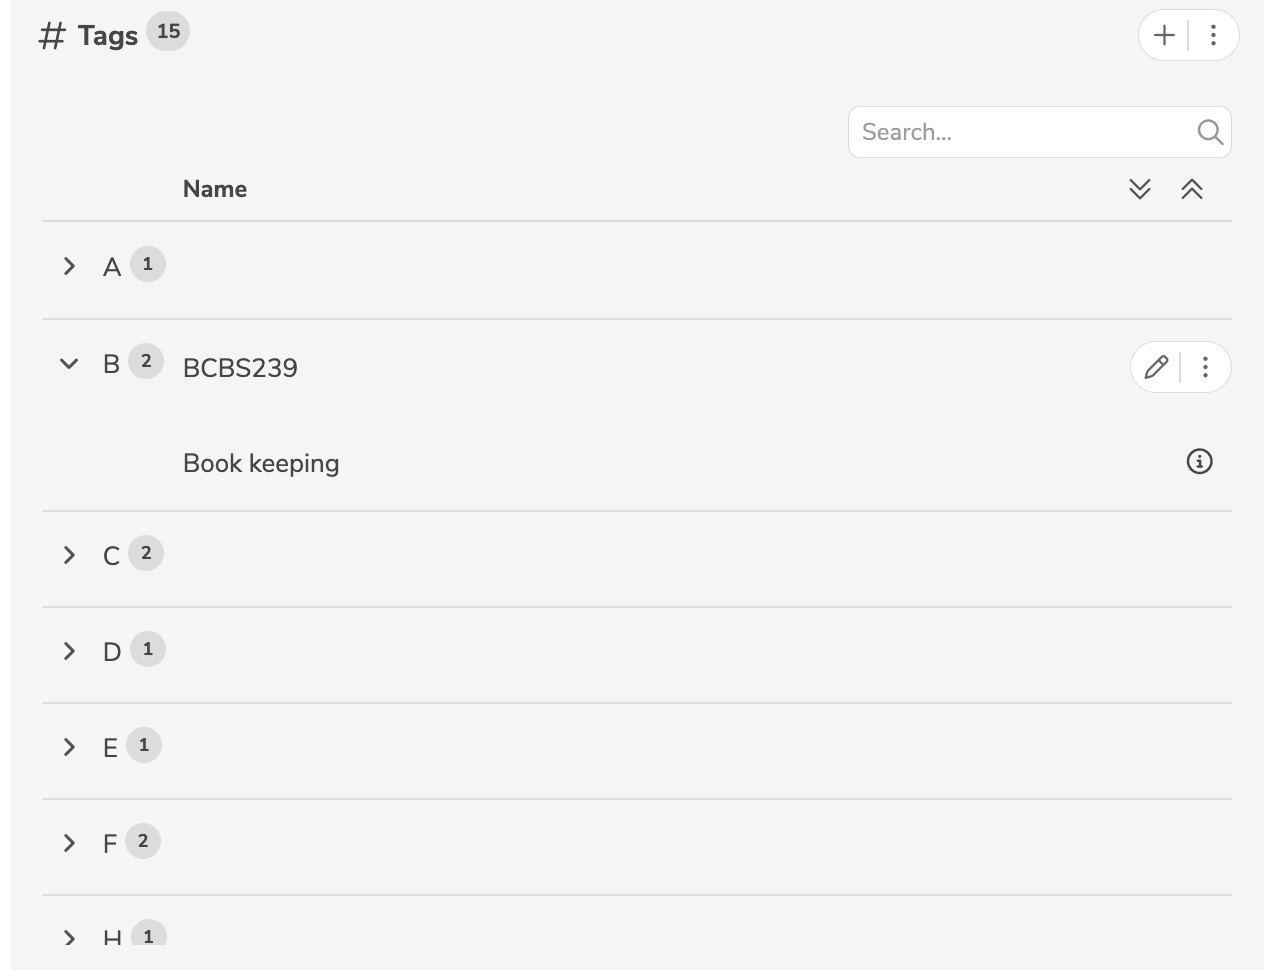
A new tag is added by clicking the icon "+" (or by selecting "Add Tag..." in the menu). A tag can be edited by clicking the edit icon (or by selecting "Edit Tag" in the menu) next to the tag.
A tag can be deleted by selecting "Delete Tag" in the menu next to the tag.
Only tags that are not yet assigned to an asset can be edited or deleted. Clicking on the tag opens the advanced search to display all elements that currently use the tag.
Reports
The built-in reports are provided out-of-the-box and can be generated both in the user interface and using the download API.
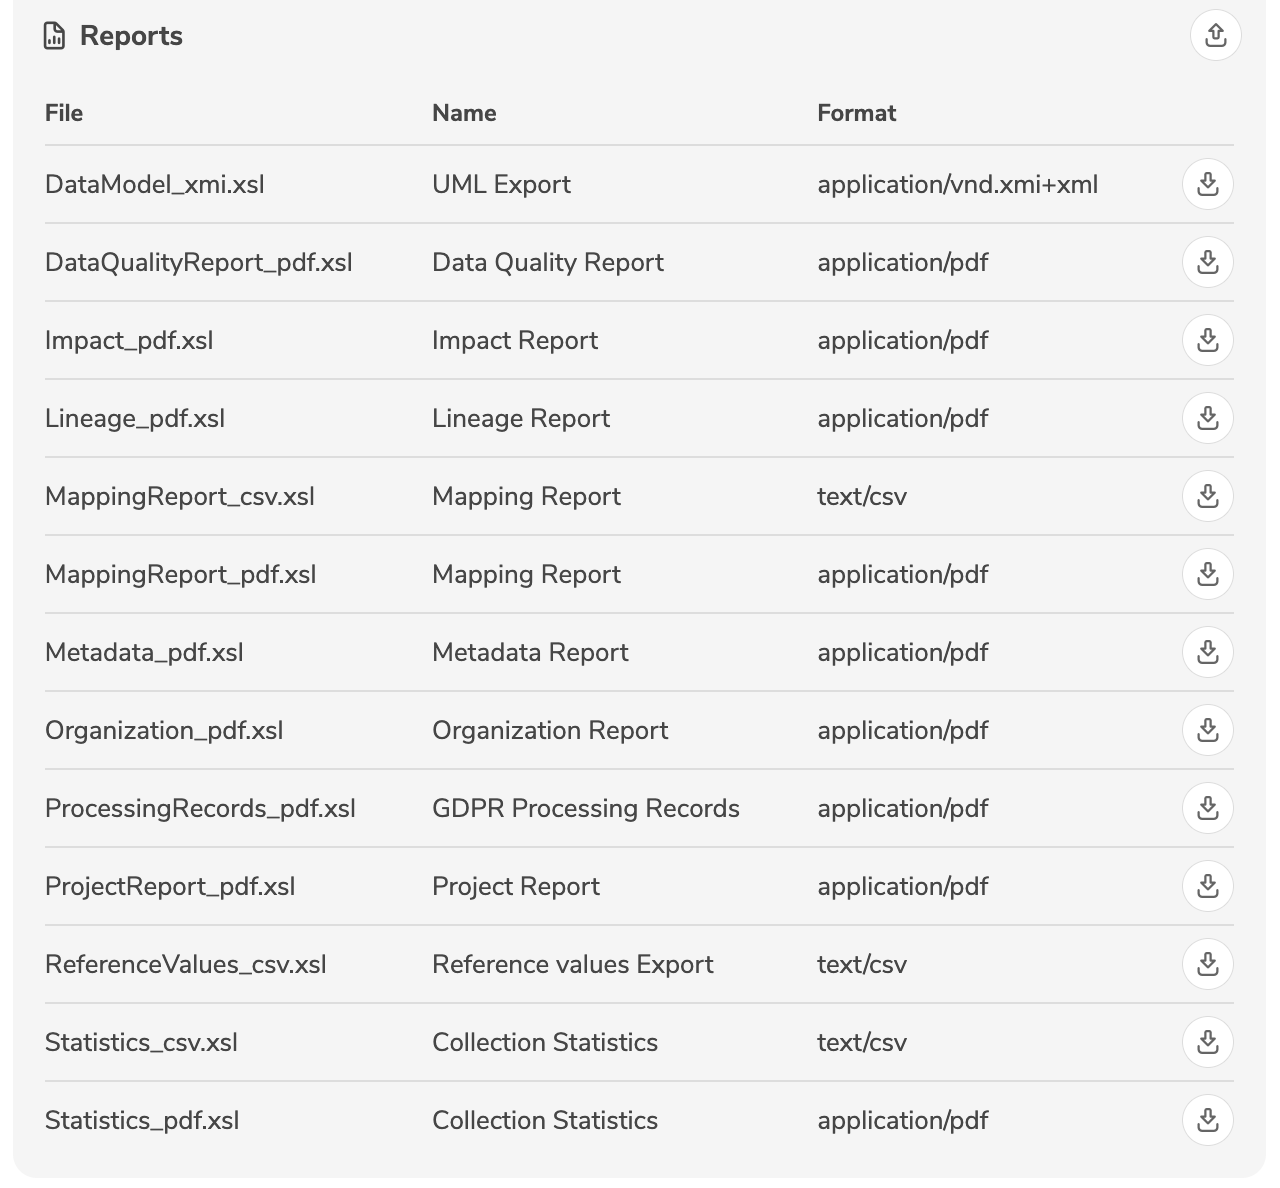
Additional, customer-specific reports can be implemented in XSLT and be uploaded by clicking the import icon.
- Clicking the export icon downloads an existing report in the format
.xsl. - Clicking the edit icon opens a customer-specific report for editing.
- Clicking the icon deletes a customer-specific report.
Delete tenants
Tenants are deleted by a system administrator in the admin console.
A tenant can be deleted by clicking the delete icon next to the tenant.
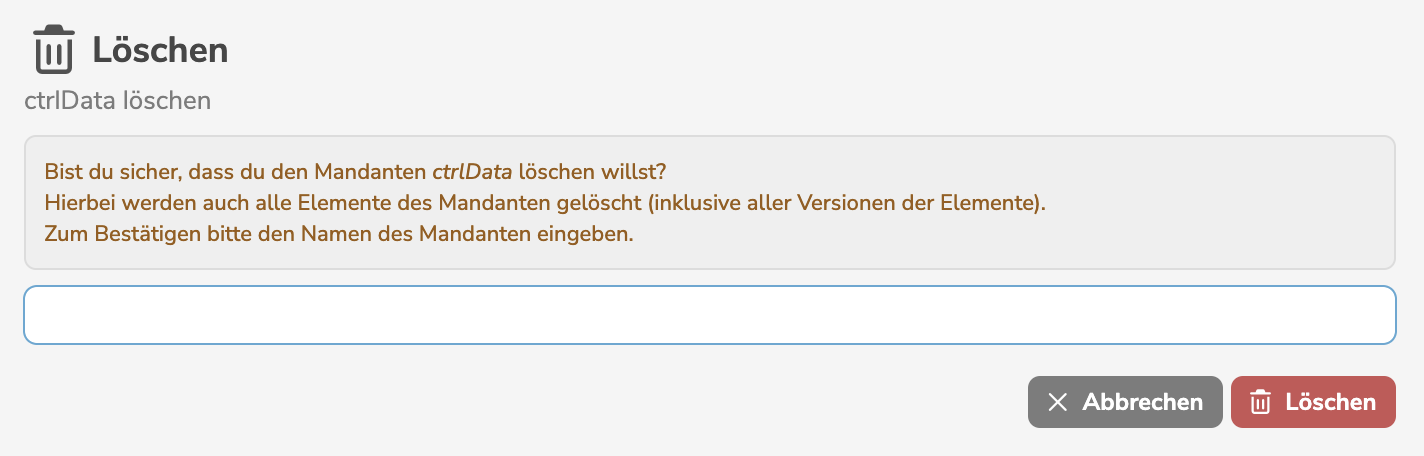
For confirmation, the name of the tenant must be entered.
A tenant cannot be deleted as long as it is in use as a base tenant.
Regardless of how many tenants exist, there is always exactly one default tenant. Prior to deleting the default tenant, another tenant must be defined as the default tenant.